Monday, December 16, 2013

The University of Colorado Greenhouse: A Botanical Gem by Rebecca Anderson

The University of Colorado Greenhouse on East Campus
On the beautiful fall afternoon of November 14, I had the opportunity to tour the University of Colorado Greenhouse on East Campus with Director of Plant Science Facilities Tom Lemieux. The tour started with a brief discussion of bio security and tobacco mosaic virus. This virus can affect a broad range of plant species and is usually transmitted by humans. After precautionary hand washing, the doors opened and the tour group of 20 citizens were allowed to enter the amazing collection of plants from around the world.
 
A sample of the plants in the greenhouse. 
Every plant in the collection has a story, and Tom Lemieux knows them all. He has traveled the world collecting specimen to add to the greenhouse. The tour touched on some highlights because it would take days to meet all the individual plants. It felt like taking a world voyage or visiting a zoo, seeing plants from South America and Asia and every continent in between. Many plants from the collection have been donated to the Denver Botanic Gardens when they have outgrown the space at CU. The greenhouse itself even has a story, originally used in California then transported to Boulder and reconfigured for CU.

Blooms from two Aristolochia species.

The plants in the collection are not just for admiration.  They are working plants, being used for research and education. Tom Lemieux used the tour to educate the group by introducing the concept of convergent evolution. This is when unrelated organisms develop similar characteristics to cope with similar environmental challenges. Tom Lemieux presented a selection of succulents that all looked very similar and asked which were cacti. Of the group, only 2 were true cacti and the others were related to euphorbia and other species.  He also showed us plants that have developed mutualistic relationships with insects such as ants and flies.  We examined the specialized structures (and odors) these plants have to benefit and attract these insects. There were a couple of varieties of Dutchman's pipe (Aristolochia sp.) in bloom that were gorgeous to see but not so nice to smell.
Plants demonstrating convergent evolution.  From left to right Euphorbia obesa, Pseudolithos migiurtinus, and Eriosyce curvispina.

I think I could go on this tour over and over again and learn something new every time.  I recommend it for anyone who loves to learn, enjoys plants, or both. The tour was organized in partnership with the University of Colorado Museum of Natural History. It is offered in the fall and spring. The best way to find out about the tour is to join the museum's email list. The tour filled up quickly and had a long waiting list, so sign up early. It's well worth the short drive to Boulder. 

Monday, December 9, 2013

Gardening in Snow Pants by Louise Heern


Bearded Iris and Catmint, nice combo!
Since moving from the Midwest to the beautiful mountains of Colorado just four short growing seasons ago, I have experienced many ‘firsts’ in the high altitude gardening world of Clear Creek County; snowfalls in late May, herds of elk and deer grazing/trampling their way through backyards, hurricane-force winds, gardening in snow-pants, and voles consuming a newly planted ornamental grass faster than I could eat a sandwich.
I remember my first summer here, standing in the cold wind (it was July) on an East-facing clearing, 8,700 feet up on the top of Floyd Hill, looking hopelessly at the huge expanse of rocks and dirt that was now my new yard. What on earth was I thinking?! Can you possibly grow anything up here?
Through trial, lots of errors and the Master Gardener Program offered through CSU Extension, I have learned a lot! And I am happy and privileged to share with you some of my successes and failures in the hope that you will get out there and plant something! And then, let us know how you are doing - we value your feedback. 
Okay, where to start if you haven’t already? I started with a small area closest to the house. Starting small made it easier and less expensive to amend the soil, an important and critical first step. And, being close to the house made for easier access to check on and water the newly planted little garden. It also created an instant micro-climate, offering at least some protection from the wind and sun. Plus you can rap on the window to scare off the critters that will inevitably find your new plants! Preferably, it is an area you can possibly protect with a small decorative fence. Before you decide on the plants, take note of the location. Which direction is it facing? How much sun will it get? Will the location take advantage of any water run-off? Match your exposure to your plant choices. Planting the right plant in the right location will tremendously increase a successful gardening experience. 
Need help deciding what to plant? Well, my 8,700 feet will not be the same as yours, as everybody has micro-climates unique to their own location, but here are just a few of my picks. I have grown them all very successfully in full, hot sun and also in part shade without protection from deer, elk or wind. They have come back bigger and stronger each year without supplemental watering. Please note, however, that they were watered on a somewhat regular basis the first season they were planted.
                Hops Vine (Humulus lupulus) - defies our short growing season by quickly covering an arbor, trellis, wall or fence in just one season. Capable of growing up to a foot a day, this hardy climber comes back bigger and stronger year after year and will reward you with chartreuse cone-shaped flowers in mid to late summer. 

                Cat Mint (Nepeta faassenii) - is very easy to grow and does best in a sunny spot. It is one of the first perennials to come to life in my garden, and never disappoints with beautiful purple-blue flowers and gray-green foliage that remains attractive throughout the growing season. 
                Bearded Iris – with close to 300 species of Iris, I honestly cannot tell you which is growing in my garden as I have received each and every one of them from friends gardens ranging from Chicago to Factoryville, PA! I can tell you, however, that since planting them several seasons ago, they have thrived, multiplied and withstood our crazy winds regardless of their exposure. The iris’ come into bloom approximately the same time as the cat mint and look great together! After the flowers have faded, the unique leaves will continue to add interest to your garden.
If you have garden related questions or interest in participating in the Colorado Master Gardener Program offered through Colorado State University, please visit our website at www.clearcreek.colostate.edu , call 303-679-2424, email christine.crouse@colostate.edu, or stop by our new Clear Creek County Extension Office at 1111 Rose Street in Georgetown. You can also visit us at the Idaho Springs Farmer’s Market the last Friday of the summer months.
Happy Gardening!

Monday, December 2, 2013

Attack of the Aphids by Louise Hearn


September 18, 2013-At Long Last!-A Lupine Bloom! Yea!!
I have a small stand of lupine. Five little plants total. The first season they started out beautiful, and then the chipmunks ran up the stalks until they bent, and proceeded to eat all the flower buds, seed heads, whatever was available at the time, smashing the remainder of the plant in the process. The second season they started out beautiful, but voles ate most of the roots before I realized what was going on and they never fully recovered. This season, I dug up what I could salvage, planted them and two replacements in wire baskets and smothered them in vole repellent. Under my watchful eye, they are now about 8 to 10 inches high, with hopeful little flower spikes peaking up from their centers. (Yes! I realize it’s September!)
Friday morning I gave them a little water and they looked great. Monday afternoon something was terribly wrong. They looked wilted and had an almost white appearance. Upon closer inspection, I discovered they were completely covered in aphids! And the base of the plants were so infested that it looked like cottonwood flying in late August! The aphids were so large, I didn’t even need my glasses to see them!! Where does this many aphids come from in two days?!?! I knew I should have taken a picture, as I have never seen anything like it! But my adrenaline kicked-in instead … Hose in hand, I violently jetted them off the struggling Lupine; but when the force of the jet hit the infested base of the plant, it scattered the aphids everywhere!

Determined to win this battle, I got down on all fours to take a closer look. Their fat little neon bodies were alive and well and practically glowing green against the dark brown of the wet mulch. To date, I’m still not sure what came over me, but I then preceded to single-handed-lay smash every single one I could find; rolling and smashing the mulch around in my gloved hands to ensure there were no survivors! I am embarrassed to admit I was actually finding pleasure in this!

Noticing a shadow, I look up to see my husband standing over me; both palms facing upwards, that incredulous look on his face. “Smashing aphids” I offered. “Maybe you should get a job,” he suggested. I guess it wouldn’t have looked so bad if earlier in the day he hadn’t caught me swatting yellow-jackets off the hummingbird feeders with the fly swatter.

In closing, I would just like to ask if anyone has the name of a good therapist in Clear Creek County … Or, maybe I will look for employment; but I can’t work in the summer! There’s too much gardening to do!! 


Monday, November 18, 2013

On Water, a new backyard "stream"


Finished "stream"
 As the year ends and we all begin to think of the highlights from our garden this past year, I must reflect of one single element alone … water.  Who in their right mind would install a water feature in their back yard shortly after our late summer monsoons and flooding??  Yes, there were surging creek waters a mile down from my house, but I was determined this was an addition I was going to make to my property.  Besides. living on a hillside near an old growth stand of pines that had stood firm against the rains gave me courage to sail on!

Beginning the project
Taking shape
I’ve had a longing to do this for years.   A renewed desire came from visiting surrounding gardens earlier in the summer where birds and butterflies were happily making themselves at home in lush gardens with the gurgling of close-by water.  What can I say – I was hooked and actually convinced myself to take it off the potential projects list and put it on the priority list instead.  This piece is not meant as a step by step outline on installing water features in your back yard; other than making sure you do your homework on site locations, design, pump specifics, linings and surrounding garden plantings and features.  Instead, I’d like to share what pleasures the finished work has provided to me as well as the surrounding wildlife.

Within a few hours of the stream bed flowing in daylight operation, there were two hummingbirds that came to investigate the small water falls in the small upper & lower pools, plus the water running through the actual stone-filled bed connecting the two pools.  I’d read that they were drawn to moving water and now I can attest, as I watched them tip-toe into the water take a ‘big-bird style’ bath and come out shaking the excess water off like a dog! Shortly after this happened, a big red tail hawk appeared in an adjacent pine and started watching for activity.  However, within 2 days he realized there were no fish to be had, so he moved on.  About this time, I also discovered I’d made my own big butterfly puddle as well. I had two late summer fritillaries that came to enjoy the sun & water one afternoon. The blooming flowers were at a premium, so it was fun to see them at the edge of the stones, drinking and soaking up the sun on their wings.  The elk have had their turn drinking from the streambed and recently a migrating flock of robins enjoyed the stream and pools for their afternoon community swim. 

I’ve rediscovered the peace and tranquility that gentle running water offers … especially outside in a natural setting. (May I also add the effect is not the same when the sounds may come from below a kitchen sink or a laundry room??)  Even a small scale fountain from your local garden center on a back deck or sunroom can provide hours of quiet and thoughtful times … just ask me how many chores are getting done while I wait to refill this feature for returning birds next Spring.

Monday, November 11, 2013

Potato Experiment - Greenhouse vs. Outdoors by Trudy Hodges

This spring I planted potatoes. I had more potatoes than I could easily plant in the
greenhouse, so I planted some of them outside in a new bed. I thought it would be a
fun experiment to see how each group fared and how much they produced. My initial
prediction was that the greenhouse group would do better since it is in a warmer and
more protected environment.
 
The greenhouse crop was buried about 6-8 inches deep and filled in as the top plant
grew. The plants grew nice and tall, with bushy green foliage. The plants died back in
late August and the greens were cut. I left the potatoes in the ground for 10-12 days
before digging to let them toughen up. I harvested about 4 pounds of small to medium
sized potatoes.
Greenhouse crop
The outdoor potatoes were buried about 6-8 inches deep and filled in as the top plant
grew. They didn’t get quite as much attention as the greenhouse potatoes and were
much slower to sprout. They were certainly not as bushy and full as the indoor
potatoes, but did eventually grow.

In September the plants died back and the chickens began to scratch and peck in the
planting bed. The weather was also changing, with a cold spell in the forecast, so I
decided it was time to dig. WOW what a difference! I harvested just over 10 pounds of
medium and large potatoes (size relative to the others that I had dug).
Outdoor crop
Next year all of the potatoes will go outside, leaving more room for tender plants in the greenhouse.

Monday, November 4, 2013

50 Beautiful Deer-Resistant Plants - A Book Review by Elaine Lockey


In my search for plant ideas to help in my heavily deer-foraged garden, I came across the book 50 Beautiful Deer-Resistant Plants by Ruth Rogers Clausen.  The premise of the book is that “you can still have a lush, thriving garden by making smart plant choices. Many stunning plants are unpalatable to deer because of their poisonous compounds, fuzzy or aromatic leaves, tough, spiny or bristly textures, and for a variety of less obvious reasons.”
 
The author stresses that there is no such thing as a deer-proof plant.  During times when deer are hungriest they will try to eat most anything. You might also notice that one group of deer leave your asters alone while another group or individual browses it any chance she gets. Plants that are considered “deer candy” and not recommended are hostas, lilies, daylilies, tulips and roses (except Rosa rugosa which deer leave alone).  Clausen offers a more complete list of these favorites to avoid. But she lists in depth many more plants that you can happily grow without feeling you need to keep watch over your garden.
 
How do you know if the damage you have is from a deer? Deer do not have upper incisor teeth so the damage will look very raggedly torn. Rabbits tend to cut off stems very cleanly. You’ll also notice shrubs that are practically bare of leaves until about 5’ high. That’s about the chewing height of a deer. Clausen reminds us, “Imagine if you had to deal with browsing giraffes!”
 
The book rates plants based on the extent that a plant species will be desired (aka nibbled on).  It then goes into good detail on how to successfully grow that species.  A healthy plant that is occasionally nibbled may be able to withstand more deer attacks.
 
So what can you plant? Here’s a very short summary. You can do an impressive bulb array using Narcissus, Galanthus, Chionodoxa, and Scilla sibirica. A sunny garden would do well with Geranium, Agastache, Echinops, Artemisia, Salvia, Nepeta and Coreopsis. Other perennials include Iris, Monarda (Bee Balm), hellebores, ferns, and ornamental grasses. Shrub choices include Mahonia  (Oregon Grape Holly), Caryopteris (Blue Mist Spirea), Boxwood,  Potentilla, and Japanese Spirea.  And there’s much more: Russian sage, lavender, yarrow, catmint, Gaillardia, and Aconitum. Clausen also includes some herbs and annuals in her book. 
 
It’s great to see a list of plants that DO work with deer instead of the depressing “don’t plant these” lists.  Maybe I can start reducing the use of my gag-reflex-inducing rotten egg/urine spray that sends the family into the house and closing windows.

Monday, October 28, 2013

Potato Followup by Irene Shonle

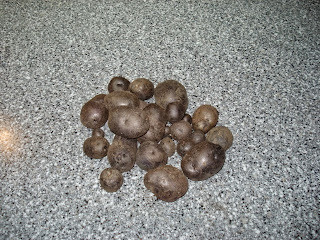
In the spring, we chitted Masquerade potatoes in a variety of ways and then planted them.   For those of you who don't want to read the original post, we chitted or pre-sprouted the potatoes to break dormancy and increase yield in our short season.  Because there was a lot of contradicting information out there, we decided to try out a couple of different methods.  We chitted the potatoes in our dark, moist worm bin,  in the dark, and in bright, indirect light.  Admittedly, this was an extremely small sample size (n=2 for each treatment at 3 different locations), so it can hardly be considered to be sound scientific research, but it was fun to see what would work best.   As a bonus, the Masquerade potatoes were gorgeous (and tasty, too!)

At the Community Garden, we got 17 total pounds from 6 plants.  2 of the plants grew together, so we couldn't really separate out the potatoes from each, but here's what our piles looked like:
From left to right:   (Worm and dark together) , light, worm, dark, light.
The "dark" treated potatoes did seem to produce the most, overall (although we can't be sure how many potatoes to attribute to the dark vs the worm on the left hand side).

Friday, October 25, 2013

Last of the greens - by Irene Shonle

I don't know about where you live, but we've gotten down to 15 at my house several times already.  I got most of my greens and vegetables in before the real cold hit, but I didn't get to everything, because I went out of town, and I knew anything I picked would spoil in the refrigerator.
On the frosty morning after I got back, I went out to the garden with a little trepidation to see what remained. I was hoping something survived.
Happily, the combination of floating row covers and hardy greens meant not all was lost.  Floating row covers will protect plants down to 28 degrees, or 24 degrees, if you have a heavier one.  

 The kale mostly survived just fine (except in places where the snow pulled the cover tight against the plant; there was some frost damage there).  Only the smallest leaves of Swiss Chard, protected by the frost-killed larger leaves, survived.  The parsley was perfectly happy -- not even a bit of damage, even where a corner of the row cover blew off!  The baby arugula was fairly sad -- I think it would have done better if I had put hoops under the row cover to keep the snow off.   I'm dreaming of a cold frame for future late and early season lettuce crops.
The last of the greens in from the garden.

Monday, October 21, 2013

Extending the Season by Rebecca Anderson


Christmas tree lights - warming and festive!


Cooler mornings have me thinking about fall, which will be here before we know it. With cabbages almost ready and tomato vines still covered with fruit in my garden, I'm planning for season extenders to give everything a few more weeks (hopefully!) to get the most out of my growing season.

Lots of different materials can be used as covers to extend the season.  The coverings must either be removed during the day or be clear enough to allow sunlight to pass through to warm the soil.  Sheets and blankets can work as long as they stay dry. If the fabric absorbs water, it will actually make the surrounding area colder as the water evaporates.  The sheets and blankets need to be removed during the day to allow sunlight to reach the plants and soil.  Floating row cover material is available from some nursery suppliers. It provides similar frost protection as a sheet but allows sunlight to pass through so it doesn't have to be removed every day.

Monday, October 14, 2013

Those Vile Voles! by Louise Heern


These baskets have worked well for protecting plants from voles
Just when I think I can no longer tolerate the impossible growing conditions of high altitude gardening, I’ll catch an amazing view of the sun rising over clouds low enough to touch; a beautiful hawk soaring across a cerulean blue sky; or a cool breeze when the rest of Colorado is melting under hundred degree temperatures. There are so many beautiful advantages of high altitude living! So, I have decided to (finally) stop complaining! And, instead of fighting the gardening conditions here, I will work along with them.

Monday, October 7, 2013

Ranch Mint Sauce by Christy Hoyl


Every end of summer season my husband and I make ranch mint sauce.  We use the recipe his grandmother and mother used and we live on a ranch, thus the name.  We find the wild spearmint, Mentha Arvensis in wet areas by a pond or creek or wetland area.  The spearmint is in the Lamiaceae family.  It is a herbaceous perennial plant that has square stalks, opposite leaves and is aromatic. Small pale purplish flowers are clustered on the stem and are prickly.  It is abundant and reseeds very well.  We enjoy putting the sauce on lamb, peas, carrots and new potatoes.  We make enough for ourselves, family and friends for Christmas gifts.

Here is the recipe for Ranch Mint Sauce 

1 cup sugar 
1 tablespoon white vinegar
1 tablespoon lemon juice      
3/4 cup water
1/4 cup finely chopped mint

Make a syrup of sugar and liquids.  Simmer for a least 5 minutes.  Add chopped mint leaves.  Pour in to sterilized jars and process in boiling water bath for 10 minutes.  Or just make a single recipe and store it in the refrigerator.  It will last for months.

Monday, September 23, 2013

Broccoli flowering by Irene Shonle

This is the first year I have successfully grown broccoli.  Hard to believe, but before I did the garden makeover where I protected my beds from critters, the broccoli was always one of the first plants that they ate.
So, I didn't have a lot of experience in growing it.  I was pleased to see the heads developing and becoming good sized, and was looking forward to various broccoli dishes (unlike some former presidents, I LOVE broccoli!).   One day when I went out to the garden, though, I was startled to see that one of the heads was starting to flower.
Broccoli on the left is starting to flower
Of course, what we're eating when we eat broccoli is really the flower buds, so this shouldn't have been too surprising, but I hadn't expected to have to watch so carefully for the stage where the head stopped increasing in size and decided to flower instead.  But that is indeed what you have to do.  When the head goes from being very tightly packed to somewhat looser and elongated, that's the time to pick the main head -- before it gets to the stage in the picture on the left.  I still used the flowering broccoli in a soup, but it was starting to become quite fibrous.  It is a much better eating experience if you pick it at the stage on the right.

Picking the main head stimulates the production of smaller side heads, so maybe I can redeem myself by watching future heads more carefully.  Or, maybe an early winter will put an end to things before I get my second chance.

Monday, September 16, 2013

Garden of 2013 - A Success by Christy Hoyl


I had a very successful vegetable garden this summer.  I live at 8,550 feet and we had a mild frost the third week in August.  The garden survived several torrential rainstorms and hail.  I had flea beetles in June munching on the arugula and other salad greens but that was it for any bug problem.  I have six raised beds lined with hard cloth to protect from the voles.  I plant the garden memorial day weekend and use seeds except I buy broccoli starts.  My garden is in full sun but the location is in a valley and close to a wetland.  Thus my temperatures are cooler and I have found I cannot grow potatoes or green beans.  The season is too short.  I certainly enjoy all the salad greens which are romaine, bibb, black seeded simpson and arugula.  I plant tyee spinach, kale, bright lights chard, shallots, carrots, peas, radishes and beets.  I do succession planting with romaine, carrots, radishes and chard.  Our friends are helping us enjoy this abundant garden bounty and it's makes me very happy to be able to have had such luck this summer. 

An excellent CSU fact sheet, Colorado Mountain Gardening Basics   http://www.ext.colostate.edu/pubs/garden/07244.html
 

Tuesday, September 10, 2013

Where is your water coming from and where is it going? by Jana Powell

Here is an example of how slopes are stabilized in nature.

This was my first lesson, as a new intern landscape designer in Evergreen, CO. This simple observation can mean the difference between a healthy and stable slope, or a mudslide. 

The heavy rains this past month have proven to be quite a challenge for mountain landscapes and gardeners. I have a friend that posted a video on Facebook of her 1/8 acre rock garden in Evergreen, that quickly became a running water feature and small creek, within minutes. 

Even very steep hillsides can be productive. Utilize boulders and rocks to make swales and dams. Create trenches where water can move productively, through the landscape. Concrete blocks with holes, and permeable pavers, allow water to percolate into the soil, while providing walking, standing or sitting areas. 

Plants and trees also slow water runoff. They help stabilize slopes and prevent erosion control. 

Mulches such as small bark, grass clippings, straw, and gravel are all good choices for erosion control. Mulch is a great choice for areas with less than 33 percent slope. Vegetation works well on areas with up to a 50 percent slope.

Monday, September 2, 2013

Bee Balm by Trudy Hodges


Bee balm, Monarda didyma, also known by other names such as: Horsemint, and Wild Bergamot is a member of the mint family - Lamiaceae.

Monarda species include annual and perennial herbaceous plants, and occurs in the wild (Mondarda fistulosa around here) as well as a cultivar. Bee balm is a natural source of the antiseptic compound thymol, the primary active ingredient in some commercial mouthwash formulas. Several species, have a long history of use as medicinal plants by Native Americans.

The plant has a flavor described as a spicy oregano, both the flower and the leaves are edible. The leaves can be picked and used fresh or dried in place of oregano, adding spice

Monday, August 26, 2013

It has been a Fabulous Summer by Sharon Faircloth


The fading, but ever-hardy, long blooming, bee-loving
catmint (Nepeta cataria)
Hasn’t it been the greatest summer?  The afternoon rains came back after several years of incredible drought.  After living in the same meadow for over 35 years, it is amazing how much the wild growth changes from year to year depending on how much moisture we receive.
 
 
Additional rainfall improved the growth of everything – the shrubs are bigger and more vibrant than they have been in years.  The flowers were everywhere and the native grasses even stayed green.  Plenty of rain, no damage from hail -- it was going so well, you know it could not last!


About the second week of August, I woke to my dogs barking.  It was the elk bark, not the coyote howl so I knew trouble was about…. I reassured myself thinking, there’s plenty of grass so they should be happy with that. 
Mutilated Moon Carrot (Sesili gummiferum)
I awoke the next morning, to find my beautiful rock garden looking like the locusts came through. Flowers were chopped; even hens and chicks were decimated!  As we have learned and painfully experienced, “wildlife resistant” plants do not equal “wildlife proof”!  To resist critters, choosing aromatics, plants with prickles and spines, tough leathery leaves and milky sap will give us the best hope of success.  Some good strategies and plant examples are found in CSU Fact Sheet 6.520.  Planttalk also covers the subject in 2302 and 2307. http://www.ext.colostate.edu/pubs/natres/06520.html
http://www.ext.colostate.edu/ptlk/2302.html
http://www.ext.colostate.edu/ptlk/2307.html 
Victoria Blue Salvia (Salvia farinacea)
Additions I made this summer included the crazy Moon Carrot (Seseli gummiferum) and some beautiful Victoria Blue salvia (Salvia farinacea).   I planted mint around them to discourage critter interest but the mint hadn’t taken yet so didn’t really help much.  Clearly, the plants lived up to their expectation of being critter resistant but that didn’t save the beautiful blooms from being rudely discarded as unappealing to the elk!  The only plants left totally unscathed were the ever-hearty, bee–loving catmint (Nepta cataria)!

Whining about the elk will subside, especially as they migrate through this fall.  Don’t tell my dogs but elk are magnificent animals, so much a part of our mountain landscape.  At least that rock garden looked magnificent for a while!

Victoria Blue Salvia blooms, guess they didn’t really care for them!


Tuesday, August 20, 2013

Somebody tell them ground squirrels that potato leaves are poisonous! By Irene Shonle

I have all the greens in my garden covered by floating row covers, but my potatoes are hanging out unprotected.   The deer come by occasionally and eat all the flowers, but recently the Golden Mantled Ground Squirrels or perhaps the chippies have been eating the leaves off the lower branches!
Chipmunks or ground squirrels eating the lower potato leaves.
I don't think they're doing a lot of damage this late in the game -- I'll be harvesting in a few weeks, anyway, but I'm wondering why they can eat them.  Any green parts of potatoes (including green skinned potatoes themselves) contain solanine, which is toxic even in small doses (http://www.nlm.nih.gov/medlineplus/ency/article/002875.htm).  Why are they suffered no ill effects?  (And no, it wouldn't break my heart if they did suffer ill effects).
Perhaps this article sheds some light on the situation: http://www.ncbi.nlm.nih.gov/pubmed/10794631
(It basically says what we know about many plants - that alkaloids vary over time and location).  Maybe the plants are giving up their alkaloid defenses, because they "know" the end is near, and the leaves matter less now in the grand scheme of things. 

Friday, August 9, 2013

Garden update - by Irene Shonle

So,  last fall, I had gotten fed up with creatures eating my garden, and had performed a garden makeover.

Here's my update: my garden is burgeoning!
Kale, mustard greens, swiss chard all flourishing
It's such a pleasant change from last year when I would go out each morning to discover new depredations and would wring my hands. This year, I just go out and harvest greens for my daily salad (have to keep up with all these greens somehow!) and smile.  Between the hardware cloth keeping the pocket gophers and voles out, and the floating row covers keeping everything from the deer to the flea beetles out, everything looks great! The bunny poop and compost have provided abundant growth, and  the rains we've been having have also meant I've hardly had to water at all.  Closest thing I've ever had to a no-work garden.

Lovin' it.

Monday, August 5, 2013

Weeds: Noxious or Obnoxious? by Rebecca Anderson


Musk thistle (Carduus nutans), photo from CSU Extension


Weeds were a hot topic at the Evergreen Farmer’s Market last Tuesday.  The extra rain this summer has them popping up in everyone’s yards and gardens.  Questions ranged from identifying and controlling specific weeds to triaging which weeds were the most important to remove.  Of course, the noxious weeds need to be a priority for removal.


Noxious weeds are not native to Colorado.  They have no natural controls such as grazers or parasites.  They out-compete native plants because noxious weeds are able to adapt quickly to our environment.  The Colorado Noxious Weed Act has divided noxious weeds into 3 categories:  List A plants need to be eliminated everywhere, List B plants need to be managed to stop their spread, and List C plants are recommended for control.


Yellow toadflax (Linaria vulgaris), photo from CSU Extension
 The first step to managing weeds, especially noxious ones, is prevention.  This includes maintaining healthy lawns and gardens, purchasing weed-free grass and flower seed, and using weed-free manure and mulches.  Cultural techniques such as establishing a population of desirable vegetation to out-compete the weeds and adequate mulching also contribute to managing weeds.  Mechanical control methods (hand pulling,  hoeing, mowing and tilling) are the next line of defense.  Biological weed control is an area that is being developed.  It utilizes the natural enemies of specific weed species.  Biological controls are slower acting, often requiring 5 to 10 years for success, and are often most effective when combined with other control methods.

Chemicals can be great assets in the battle against weeds.  If choosing to use an herbicide always read the label first!  There are many herbicides on the market, so before selecting a product, make sure the target weed has been properly identified.  Your county extension office and weed department are great resources for assistance with identification.  Once identified, the life-cycle of the weed can then be considered.  Is it an annual, perennial, or biennial?  Timing of herbicide application, frequency of applications, and rate of application should be correlated with this information.

The Colorado State University Extension Noxious Weed Management Pocket Guide has great pictures for several common noxious weeds and tips for their control.  It can be found at the following website: 


The Colorado Weed Management Association has a complete list of Colorado noxious weeds at their website with photos and descriptions of most of the List A and B species.  This can be found at:


Don’t forget to visit our booth at the Evergreen Farmer’s Market.  We have a noxious weed of the week and a noxious weed guide book to get you started on planning a management program for your own yard and garden.

Thursday, July 25, 2013

Mullein vs Green Gentian by Irene Shonle

This year, we're seeing a lot of Green Gentian (Frasera speciosa, also known as Monument Plant) blooming.    This spectacular plant is monocarpic, meaning that it blooms once and then dies, much like a Century Plant (Agave).  It was formerly thought to be a biennial, but research (much of it done by Dr. Inouye at Rocky Mtn Biological Laboratory) has proved otherwise. It will often sit as a rosette for 20-80 years before blooming, and once it reaches blooming size, it waits for an environmental cue in order to synch with other plants (this allows for cross-pollination).   It seems as though this year, we're having a modest mass flowering (some years are much greater, apparently there was an unbelievable flowering in the Crested Butte area in 2003).  For more on this interesting plant, see this article from the Montana Native Plant Society.
Green Gentian (Frasera speciosa)

I point this out because I am worried that people are confusing this cool plant with the Colorado  list C noxious weed, Mullein (Verbascum thapsus).   I don't want people to pull the wrong thing by mistake; several people who have come into my office have almost done so.

Here's how you tell them apart:
Mullein has fuzzy leaves, Green Gentian's leaves are smooth.
Mullein has yellow flowers, Green Gentian's flowers are a greenish white.

Pictures of Green Gentian: http://www.swcoloradowildflowers.com/brown%20green%20enlarged%20photo%20pages/frasera%20speciosa.htm

Pictures of Mullein: http://www.colorado.gov/cs/Satellite?c=Page&cid=1212573833941&pagename=Agriculture-Main/CDAGLayout

The last picture on this post on mullein has a side-by-side comparison of the rosettes of Mullein and Green Gentian:
http://www.plantsofmagnolia.net/Non_Natives/Scrophulariaceae/Verbascum/Verbascum_thapsus/Verbascum_thapsus.htm

Friday, July 19, 2013

Something different to consider ……

In early 2013, I was entranced by an article I read on Hellebores, a delicate early flowering plant with dark green leaves and a glossy stem.  To my delight, I also discovered that it is possible to grow them at altitude!  I immediately put this plant on my wish list for 2013. 

Hellebores the article claimed were gaining a cult-like fancy & following.  What??  I thought … what have I missed, where have I been? Where do I find them??  I think all too often we get stuck in favorite routines of perennials, natives, vegetables and the annuals we enjoy for color in our garden.  I offer we should take advantage of the opportunity to broaden our plant experiences with new things.  How can we miss on a plant that is billed as early blooming (late winter to early spring), long-lasting  delicate flowers, frost resistant and low maintenance ?!!  Can we be so fortunate to have this as an option in our special foothills environment?  These plants are not usually found in the big box store nurseries, you are better off looking at your local garden center or trying an online grower.  Different varieties of hellebores offer a fairly broad range of growing zones as well.

The history of Hellebores is intriguing.  It is said that in Arabic, “helibar” means a remedy against madness – maybe appropriate for determined gardeners at altitude, I wonder??  It is also hinted that its mild leaf toxicity may have played a part in the poison solution that killed Alexander the Great.  The Europeans have long valued this plant from medieval times.  Today, visitors can even visit the Jardins de Bellevue, France’s National Collection of Hellebores located in Beaumont-le-Hareng.

But back to the Rocky Mountains for further insights.  I purchased 2 plants from a garden center in early March.  These would become my test plants.  They are Helleborus niger – HGC Jacob, pretty much the only variety I have found locally. The plants have white flowers that turn green when they reach maturity and begin to nod a bit. They do well in part to full shade – best in a naturalized setting.  It will bloom from Nov – Jan.  My garden center subjects finished blooming in late March.  They need slightly alkaline soils, well drained.  Allow the soil to dry between waterings.  True growers and those into cultivation of different Hellebore varieties may preach on care and fertilization plus all the right “rules of the road” for proper growth. Being a true novice with these plants, I am taking the course of learning by experience, like watching leaves turn yellow after indoor blooming ended.  Thinking that I was killing the plants, I started giving them sunshine breaks outside in preparation for outdoor life after the April snows.  Immediately, the leaves started turning green again and the plant, now 2 months later, has survived several curious attacks by elk or deer that’ve pulled the plant out of the pot but didn’t touch or eat a single leaf!!! 

Could it be I’ve discovered a true browse resistant plant for our altitude and local critters??  Perhaps I should not hex myself by wondering, but if you’re in the mood to try something new – try a Hellebore.

Thursday, July 18, 2013

Saturday, July 13, 2013

A Morning at Applewood Seed Company …


Trial Garden
How often can we awake and wander outdoors with our coffee or water in hand to watch expanses of blooming flowers and happy bees, butterflies and beetles cruising through delightful trial plots in need of pollination?  Such was the case in late June when the Native Masters group, metro area Master Gardeners and interested others attended a tour and educational session at Applewood Wholesale Seed Company in Arvada.  What a bit of heaven to have tucked away in our own urban corridors!!

Our tour was mostly led by Diane Wilson, but we were also treated to a historical review of the company and the work they do by Gene Milstein, president of the Applewood Seed Company. 

Monday, June 24, 2013

War on Aphids by Trudy Hodges


Aphids galore!
I grow my plants in a greenhouse, the perfect hot, moist, environment for aphids. My population stayed small and under control until I blinked and then it exploded. It seemed that over night my plants were overcome and I was behind. My lettuce, spinach, and other leafy greens were the hardest hit, followed by the potatoes and squash leaves.
 
Not wanting to put chemicals on the food I plan to ingest, I brought in bionatural, beneficial predators - ladybugs. That evening and the following morning I witnessed a decrease in the aphid population, as well as a decrease in the ladybug population. I have plenty of aphids to feed them, but they seem to be disappearing or dying. The plant under growth holds an abundance of dead predators, further exploration fails to reveal any young larva stage ladybugs. The aphids are back in full force.

Friday, June 21, 2013

Why is my recently planted shrub look so dry? I am watering it. by Tina Ligon


The slightly less stressed lilac
I just got a call from my neighbor asking if I could please look at her lilac that she had planted about 3 weeks ago. "It is just not looking like it is going to make it". I happened to be between tasks so I went right over. As I was getting out of the car I started to laugh and asked if I needed to get an emergency light for my car for this type of call as she was standing there waiting next to the shrub.

Here is what I saw and the history that I got. The small lilac is about 1 1/2 feet tall and fully leafed out. The leaves were folding and had a dry appearance all over.

Wednesday, June 19, 2013

Tips for planting on a slope by Irene Shonle

We live in the mountains.  Almost by definition, that means that where we are trying to grow things involves some sort of slope.   Some of them are gentle, others are steeper.  This particular post will discuss planting on a gentle slope (see the article on the Mountain Gardening website on dealing with steeper slopes and planting retaining walls).

If you are planting on even a gentle slope, it is a good idea to build a shallow shelf or basin to hold water.  Otherwise, most of the water goes rushing down the slope and won't penetrate to the roots.

Here's a picture of what I mean:
It's a bit hard to get a good picture here, but the slope goes down towards the right.  The earth shelf or basin built up on the downhill side keeps the water and allows it to soak in.  Success rates are much higher this way!

Sunday, June 16, 2013

An Ode to Floating Row Covers by Irene Shonle

I think I have become something of a proselytizer for floating row covers up here in the mountains.

Why?

1.  You can plant earlier -- floating row covers provide anywhere from 3 to 8 degrees of frost protection, depending on the style (frost "blankets" obviously providing more protection than the thinnest "summer insect covers").

2.  They keep off insects.  Your arugula will be tender and free of flea-beetle damage if you keep it covered from seed.   Same goes for aphids (unless you transplant them into your garden with your seedlings)

3.  They keep bunnies, deer, and chipmunks out.  No more buffet lunch for these critters!  And if you protect your plants with a 1/4" wire mesh beneath the beds to keep out burrowing animals such as pocket gophers and voles, you're in tall cotton.  Or tall lettuce.  Or whatever.  It's nice to see all of my seedlings growing where I planted them, rather than going out to survey the damage each morning.  Makes for a much more peaceful existence!
My new garden with mesh below and floating row cover above -- I'm not battling anything!

Friday, June 14, 2013

The Things You Discover While Gardening.... by Irene Shonle

As I was working in our demonstration garden a couple of afternoons ago, I admired the lacy blue-green foliage and abundant yellow flowers of the golden smoke, or Corydalis aurea that had seeded its way around the garden.  It is a native pioneer plant, readily colonizing disturbed, open soils.  Given how the pocket gophers routinely take out parts of the garden every year, I am grateful for its willingness to fill in and cover that bare ground.   It is pretty short lived, and can start to look ratty in the garden later in the season, but while it is at its prime, like it is right now, I let bloom merrily away.
Golden smoke or Corydalis aurea

This is all probably familiar to many people who grow in the mountains.

Friday, June 7, 2013

Winter annual weeds - by Irene Shonle

I meant to get this post out earlier, but I just didn't have time!
Many winter annual weeds have already come up:  cheatgrass, alyssum, field pennycress, and more. The key to controlling winter annual (and summer annual weeds a little bit later) is to control them before they go to seed.   The trick is to get all of the seeds that germinate, and to not let any go to seed.   New crops may come up from the seeds that are in the soil; get them while they're little, too.  A few years of persistence, and you will find dramatically fewer weeds.  But persistence is the key!

In a perfect world, you'd just hoe them all under when they look like this:
Field pennycress (Thlaspi arvense) just germinating -- so easy to hoe at this stage